Category: Blog

  • The Great Inkwell Experiment

    There have been several thoughts expressed to us recently, showing concern about how useful old inkwells actually are, due to evaporation rates. It occurred to us that it might be useful to have some empirical evidence either for or against (or, more likely still, both) this feeling. We have a number of inkwells in our stock, spanning a couple of centuries and any number of designs, so we are in a good position to try out a variety of types. It is our hope that this will provide everyone with a better idea of what to look for—or not—in an inkwell for regular use. (Conversely, we may even prove that inkwells are useless in modern life. Who knows?)

    proposal:
    1. Six inkwells of different design will be filled and closed with nothing more than their original lids. Included will be:

      1. glass well with a simple gravity-closing hinged lid;
      2. glass well with a silver snap-close hinged lid;
      3. metal well with glass insert and a hinged outer cover (thus with space between the insert and the cover);
      4. wooden well with glass insert and an unhinged cloth-lined wooden lid;
      5. glass writing-box bottle, with threaded brass lid;
      6. pottery ink bottle, with a new, replacement, cork;
      7. (control) plastic graduated cylinder, open;
      8. (control) modern glass ink bottle with plastic lid and synthetic lid liner (J. Herbin).
    2. Each container will be filled with distilled water. As we are comparing loss from an inkwell, rather than how different inks evaporate, the actual material won’t make a difference so long as it is consistent through all of the containers. Notably, water has several advantages:

      1. it has universally known qualities: everyone knows how water behaves in their own environment, and it will thus be easier to translate how water behaves relative to your own preferred ink, rather than, say, comparing how the J. Herbin ink in the experiment compares to your Noodler’s;
      2. it is easily available, should anyone want to duplicate this experiment;
      3. it is clean and cheap.
    3. All containers will be kept in the same enclosed space (a section of our lawyer’s bookcase.) Relative humidity will be recorded daily.
    4. Each container will be opened briefly on every seventh day. This will help to approximate the air exchange which happens during normal use. While some people may open their ink containers more often, and some less often, we felt that once-per-week is a good compromise which will reflect average use. When it comes to evaporation, this is actually a fairly important factor. A gas (in this case, the ink solvent represented by water vapour) will expand to fill all available air in a given pressure system. In plain language, fresh air is empty space for the water vapour to fill, and every time you open your ink container, you let in more fresh air. How much of a difference will this make to ink evaporation? I’m not sure, but we are trying to duplicate normal use, and normal use includes letting in fresh air every time you fill or dip your pen. And, we are only opening the containers briefly because the majority of users are filling fountain pens; the variation between dip pen and fountain pen use might be a subject for future study.
    5. Each container will be monitored by weight daily, for four weeks. (Mass is more accurate than volume, as we won’t lose any volume to the testing equipment. And it’s cleaner and easier.) We will use the metric system throughout, as it can accurately place data to multiple decimal places. This is important, as we can trace even the minimal loss of volume from tighter-fitting lids.
    6. Data will be recorded and converted to per cent loss, and the final results graphed. We will post the results on a weekly basis, as it’s more fun that way. Results will be posted to both the Fountain Pen Network and here, in our blog. Additionally, we will publish the results electronically (in PDF format) and encourage wide distribution.
  • Breaking Down a Parker Vacumatic Filler Unit

    One of the giants of American pen manufacturing, Parker, produced millions of pens using the vacumatic filling system. It proved to be reliable, provided for a huge amount of ink storage, but also intimidates many collectors. We hope that this complete tear-down will remove much of the mystique from this venerable but reliable piece of fountain pen hardware.

    To begin with, fountain pens had sacs to hold the ink. Housed in the pen barrel, various methods were used to squish, twist, or press the air out of them, providing suction to draw up a supply of ink. In the 1930s, Parker developed the proprietary vacumatic filling system. Instead of a sac, the barrel itself housed the ink. A rubber diaphragm was installed between the ink chamber and a spring-loaded pump which, when depressed, would force air out of the chamber, creating a mild vacuum which would pull ink into the chamber. For detailed drawings, see Richard Binder’s very excellent Anatomy of a Fountain Pen II: The Parker Vacumatic

    There can be, however, some confusion as to the state of the pieces. Are they glued together? Is shellac involved? Let’s look at a later-1940s filler unit, as this is often the kind encountered.

    1. The Teardown

    Vac-filler Teardown

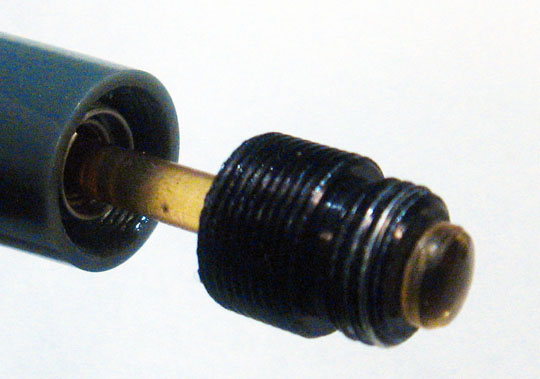
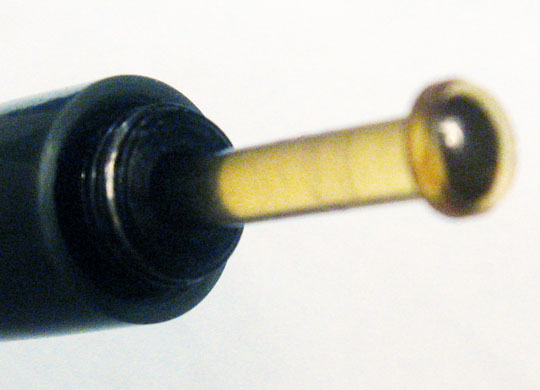
    This is the complete filler unit, taken from a Parker “51”. It looks pretty complicated, especially compared to simple squish-the-sac filler systems. However, when you reduce it to its component parts, it is not nearly so fearsome.

    Vac-filler Teardown

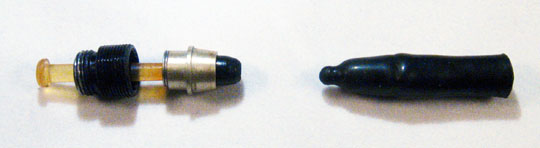
    Our first step is to remove the pellet socket. The plastic used in manufacturing these sockets is, sixty years later, quite brittle. Try this at home and you will likely shatter it (ours happened to be loose on the plunger.) This is the one piece glued on originally.

    Vac-filler Teardown

    The next piece is the retaining collar. Keep in mind that this piece floats freely on the plunger shaft/spring, and should easily come off.

    Vac-filler Teardown

    Vac-filler Teardown

    The spring end is fit between the prongs on the end of the plunger and is not glued, but is instead kept in place by the pellet socket. Over time these prongs can lose their flexibility, causing the pellet socket to become loose; a drop of cyanoacrylate glue will hold it in place.

    Vac-filler Teardown

    Finally, the threaded securing screw slides off the plunger. This can be made of aluminum or, more rarely, plastic. Again, this is a freely floating piece, not attached in any way to the other pieces.

    2. The Spring and Retaining Collar

    Vac-filler Teardown

    As a bit of an aside, let’s look at the relationship between the spring and the retaining collar. The larger-wound end is held in place simply by virtue of it’s large diameter; no glue or shellac need be applied. Occasionally it gets pulled down inside a bit, and may seem to be glued in place. It’s not, and can be gently but firmly worked loose: use a twisting motion, which will take advantage of the coiled shape of the spring to ‘unscrew’ it from it’s seat.

    3. Rebuilding

    Generally cleaning is just a case of giving everything a good soak in warm ammonia water. This will soften any caked-on rubber or other unidentifiable muck, and dissolve any leaked ink. Use an old toothbrush to clean out the crevices, and repeat the process until things are freely moving. A dental scaler is excellent for paring away hardened rubber from around the tapered seat on the retaining collar.

    We cannot overstate the importance of thoroughly cleaning the threads of the securing screw. If any crud remains on the screw itself, in the barrel threads, or in the blind-cap threads, then the pen will likely not go back together properly. At least, the blind cap will sit askew; at worst, the diaphragm seal will be compromised and the barrel will leak. Again, we turn to the dentists: a pick is excellent for chasing threads (be careful if it is plastic!) Another option is to make a thread-chaser from an old securing screw (this trick can be attributed to Ron Zorn. I refer to mine as the “Zorn tool”.)

    Once clean, the rebuild is simple: we assemble the parts in reverse order.

    4. Installing the New Diaphragm

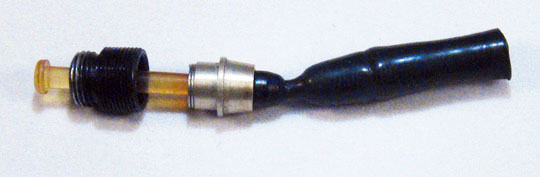
    These filler units take the “debutante”-sized diaphragm. Don’t try to substitute a regular pen sac, however tempting, as it just won’t sit right. Here we have a diaphragm, trimmed to 11/8″ long.

    Vac-filler Teardown

    We seat it firmly in the socket using a tool which will reach up inside the diaphragm to cup the tiny ball inside. A time-honoured tool is the end of a Q-tip which has had the cotton ball trimmed off. Fancier tools can be made of 3/32 brass tubing, but be sure that it is smooth, with no sharp edges, which could damage the rubber.

    Vac-filler Teardown

    Vac-filler Teardown

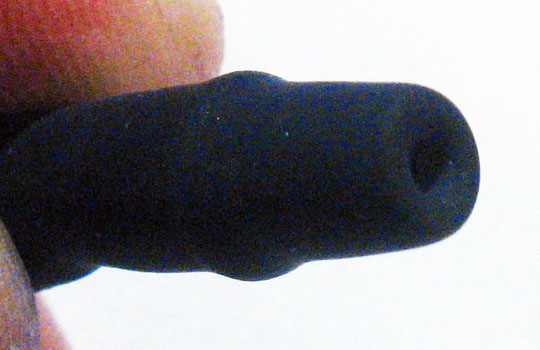
    We brush the diaphragm with 100% pure talc (and nothing but, please. The last thing you want is gummy cornstarch in the works!) Now the fiddly part: we invert the diaphragm so that it wraps back over itself. It’s stretchy and tough, so just wriggle it back over itself. Occasionally, bad words may ensue. The end should fit snug and flush against the top of the tapered bottom of the retaining collar. If there are any uneven edges, trim them with a sharp blade (you can press right into the collar, it’s tough.) You do not need to secure the diaphragm with any kind of glue or adhesive. The pressure of the securing screw pressing down on the retaining collar will keep it in place.

    Vac-filler Teardown

    Now check that, when you hold the pieces together and fully depress the plunger, the diaphragm is fully extended. If you trimmed it to 11/8″ it should be fine.

    5. Re-installation

    Re-installation is where all the parts work together: tightening down the securing screw is what holds the mechanism together, rather than glue. The first step is to lubricate the outside of the diaphragm. Don’t skip this step, as rubber is stretchy and grabby; it just won’t work without soapy water, or spit, or K-Y jelly. Take your pick.

    Vac-filler Teardown

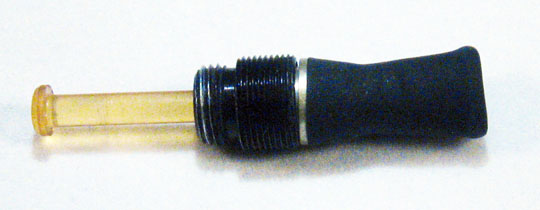
    After the rubber is all slippery, gently work the diaphragm down into the barrel. Make sure, during the process, that the end stays seated firmly on the tapered retaining collar. You can easily feel when the works are in place. Using only your fingers, tighten down the threaded securing screw just until it starts to firm up. Now stop.

    Reverse the pen, and look down the barrel with a bright light. Push the plunger a few times while you are looking down into the gloom. You should see the end of the diaphragm, damp but completely even, with no creases or folds. It should move smoothly when you push the plunger. If anything looks odd, loosen everything off, pull out the unit, and re-install it. Patience and humility now will save you from stains, frustration, and self-loathing later. If there are any folds or gaps when the diaphragm is tightened down, the pen may leak, fail to fill properly, or even crack when you tighten the securing screw down.

    Vac-filler Teardown

    Once the diaphragm is properly seated, you can tighten down the securing screw properly, using the right tool. (I’m assuming you have one, because you got the unit out in the first place.) Tighten it down so that it is snug, but not too tight. The wide portion of the securing screw should be just below the end of the barrel, like in the photo. If you tighten it too far, the excess pressure could bulge the plastic, or even crack it. Remember, any difficulty you may have had in removing it was likely because of six decades of crud and ossification.

    Vac-filler Teardown

    Try screwing on the blind cap. If it doesn’t feel smooth all around the circumference of the join, try tightening or loosening the unit slightly. If nothing works, take the unit out and re-chase every bit of threading you can find. Then repeat the installation process. A word of warning: should you try to sand down, or otherwise trim the blind cap or barrel to hide the unevenness, the wrath of the Pen Gods will descend, and your remains will be carried away in a small paper bag. Just chase the threads and everything will be alright.

    The vac-filler unit was a brilliant invention, and is still an easily-found part of fountain pen history. A properly serviced vacumatic filler unit will last for decades. We hope this has helped to dis-spell some of the mystique of the process of restoring this simple machine, and will help those trying to preserve those that remain.

  • Review: The Marbled Paper of Robert Wu

    We have a serious weakness for arts and crafts. The kind of high-quality, useful things you just can’t find in regular stores anymore. So, we made a pilgrimage to the One of a Kind arts and crafts show in Toronto this past November, with a special eye out for our specialty: reading and writing paraphenalia.

    Much of the show—hundreds of dealers and hours of browsing—was the usual run of pottery (not much, but nicely done), cutting boards (by the hundreds), various clothing (from nice to excruciating), and all sorts of food (both delicious and strange; some both.) And reading and writing? Pretty much a vacuum, with one notable exception: Robert Wu.

    To be fair, we met Robert at the same show, in it’s spring incarnation, earlier in the year. We liked him then, and thought we might come back just to see him again. And so there we were.

    The Marbled Paper of Robert Wu

    Robert is a nice fellow, with a nice booth. No, make that a nice fellow with a breathtaking booth. You see, Robert is a craftsman in marbled paper who should have been born in Florence hundreds of years ago. As soon as he starts talking you can see the passion: his knowledge of the the history; the original techniques of marbling; the hundreds of hours of work—no, craftsmanship—on display. His skill is recognized by more than just craft show browsers and bloggers: his works are in the permanent collections of both the University of Toronto and Harvard University, and in private collections around the world.

    Paper marbling has a long and distinguished history, and the practice spans global cultures, East and West. The techniques used today are almost unchanged from those times: inks are floated on a thickened goop (technically “size”), things are done to them to produce swirling patterns, and fine paper is laid down on the ink to pick up the ink. Rinse, dry, and there is art!

    Robert’s background is in traditional European methods of book art: fine bindings, slipcases, and marbling. However, he has gone beyond the utilitarian with a series of marbling-as-art pieces, ranging from the representative (peacocks and trees) to the abstract (agate slice?) In browsing through the available pieces, you can easily tell from the subtle differences between each that this work truly defines that somewhat threadbare phrase: one of a kind. And being a quiet, humble sort of fellow has its drawbacks: he doesn’t charge nearly what he should.

    The Marbled Paper of Robert Wu

    In the spring we bought an 18″ x 24″ Japanese wisteria print (no, not print. Depiction? Marbleization?) for a paltry $40.00, which now has pride of place on the dining room wall. In November, we were looking for something different: traditional marbled paper for use in re-lining antique boxes. This is a well-established practice, especially in European stationery storage boxes. We are always looking for good suppliers of traditionally-produced restoration materials, and Robert didn’t disappoint us. He has a full line of suitable marbled paper, and is very open to specialty orders; a sample booklet can be had for $5. Everything is done by hand, by Robert, here in Toronto. We quickly found suitable paper for what we had in mind, and picked up extra in a slightly different pallette. The inks he uses are not the sort to flake off, and the paper is thin enough to fold, but heavy enough to resist wear.

    This is not be what we normally think of as paper: white stuff on which you write, preferably with a fountain pen. But it certainly is worth a category of it’s own: beautiful, historical, useful, wonderful. Make that categories.

    To learn more of, browse the work of, or contact Robert Wu, his website is: www.studiorobertwu.com

    disclaimer: This is a review; we have no financial connection with this artist.
  • The Fountain Pen Convert: A Cautionary Tale

    Messy
    stains
    fingers

    Leaky
    scratchy
    Bleeds-through-the-paper
    Old-fashioned

    To me, that was the fountain pen. Dip pens were worse.

    When I was a teenager, I was into calligraphy, and had a beautiful old dip pen with many nibs. Although I did enjoy using it, I found it frustrating because of the lack of quality paper. It was scratchy to write with, and the ink tended to bleed.

    I had actually bought a nice Schaeffer Connoisseur more than 15 years ago, but it was not for me. It was an anniversary gift for my husband, and I was humouring him. We had been into a beautiful store several times, and he always stopped by the fountain pen display. He had been given one years before, but (probably through moving here, there, and everywhere) had lost it. He had always wanted a replacement, and who was I to deny something that was so lovingly remembered?

    Whenever I would try to write with it, I found it really odd feeling, and awkward to use. It was big and heavy; my fingers were telling me they did not like this type of pen. But it has been wonderful to see him use it regularly. Anything that was to be written had to be done with the pen. But I felt led away to the ball points, and then the gel pens.

    In recent times, he discovered how much he liked Parker 51’s. After finding his first, he was so excited about them that he researched the history of the Parker Pen Company. He went to the library and got out the pen books that talked about how fountain pens were put together and, more importantly, how to fix them. He wanted to be able to buy something that was beautiful, not only to look at, but also to use. He wanted to encourage others to experiment with their choice of writing instrument, and come on over to the Fountain Pen Lovers side. He went online to connect with the people who were willing to share their wealth of knowledge with those who were like-minded. Through this whole time he is sharing what he is learning with the rest of us: our son, 17 years old, and two daughters 16, and 12.

    In the mean time, I’m going with the flow; you know how the conversation would sound:

    “Wow sweetie, the Parker 51 comes in how many colours?” (Some look the same to me.)

    “What do you call that thing on the end? Oh, that’s what they call the jewel?” (I thought it would look, well, like a jewel.)

    “You want to buy the book all about Parker 51s. Okay.” (How much!?)

    “The design on the cap is called what? Oh, there are more than one design and they come in gold and silver…”

    “That pen was sold for how much?!” (That’s crazy, it’s just a pen!)

    I knew I had just revealed my ignorance when my daughter (the 16-year-old) could tell me exactly what that pen was worth, and why it was more than I would have guessed. By this time, all three of my children had left the ‘normal’ pens (also known as “ink sticks”) behind, and were proud owners of fountain pens, even taking them to school.

    There was only one thing left for me to do: if you can’t ignore them, join them. It was time I caught up to the century my kids were living in (even if it was the previous one,) and I wanted&emdash;no, needed&emdash;a fountain pen too! Something is wrong when kids get in on something good before the parent.

    So I am now the proud owner of a Parker 51 (burgundy, gold-filled cap with converging lines, grey jewel.) It has a fine nib that writes beautifully. It was actually the Shoppe pen; I had tried it out and, well, what can I say? It was like semi-sweet chocolate to the tongue, the feel of fine silk to the fingers. My whole hand loved the feel of the pen and how I wrote with it. We (the royal ‘we’, that is) have discovered why we like a certain filling system better than others, what nib we like, and what colours.

    Recently my husband found a very pretty stripey Duofold. Hmm, I see where this is going. One cannot use only two pens (the Shaeffer and Parker 51) for everything. A distinguished person must have as many pens as needed: for writing on different pads, for different moods, for carrying in different bags and pockets.

    Little did I know when I fed the love of fountain pens all those years ago it would come back to me like this. We (the greater ‘we’, that is) are completely immersed, sometimes literally, in the world of fountain pens.

  • The Humble Bamboo Skewer

    One of the most versatile, and cheap, tools in our shop is the humble bamboo skewer. Familiar to most of us as the disposable vehicle for grilling kebabs, bamboo skewers have several qualities which make them an unparalleled shop tool.

    bamboo grove
    a bamboo grove
    Creative Commons photo by: Crystalline Radical

    Bamboo is a tough plant, technically a grass but often presenting itself as nearly a tree, with long, fine, woody fibres. The plant itself grows phenominally quickly, its shoots reaching full height and diameter in a matter of days or weeks in the spring, and then using the balance of the growing season to thicken inside. Varieties can be as thin as your front lawn grass, or as thick as a tree. When the larger bamboos are split, they can be milled into very tough lumber, and some are split down to the size we need for restoration: about 1/8″ in diameter and anywhere from four to twelve inches long.

    Skewers come in different shapes, as well as lengths, and we keep several (pictured here) in the shop at all times. They are easily trimmed with a sharp knife to whatever shape is needed, and are disposable when necessary. We often buy ours at the dollar store, but sometimes make the pilgrimage down to Chinatown, where the restaurant supply shops have the more exotic varieties. (The spatula-shaped one in the photo is one such most excellent version.)

    Bamboo Skewers

    The long-and-strong fibres mean that they never break off at an inconvenient time, and pounding the end with a hammer makes a quick brush for liquids.

    Following is a list of some of the uses we have found for these handy tools:

    • probe,
    • mixing epoxy glue,
    • spreading glue,
    • putting finish (or stripper, or glue, or stain, or etc.) into very tight corners,
    • gentle scrapers (great for cleaning old patinated brass),
    • dropping boracic acid suspension on to delicate silver parts, as soldering preparation,
    • pinpoint application of flux, when soldering.

    Make a place in your tool box for a package of bamboo skewers: you will be amazed at how often you reach for them!

  • The Toronto International Pen Show

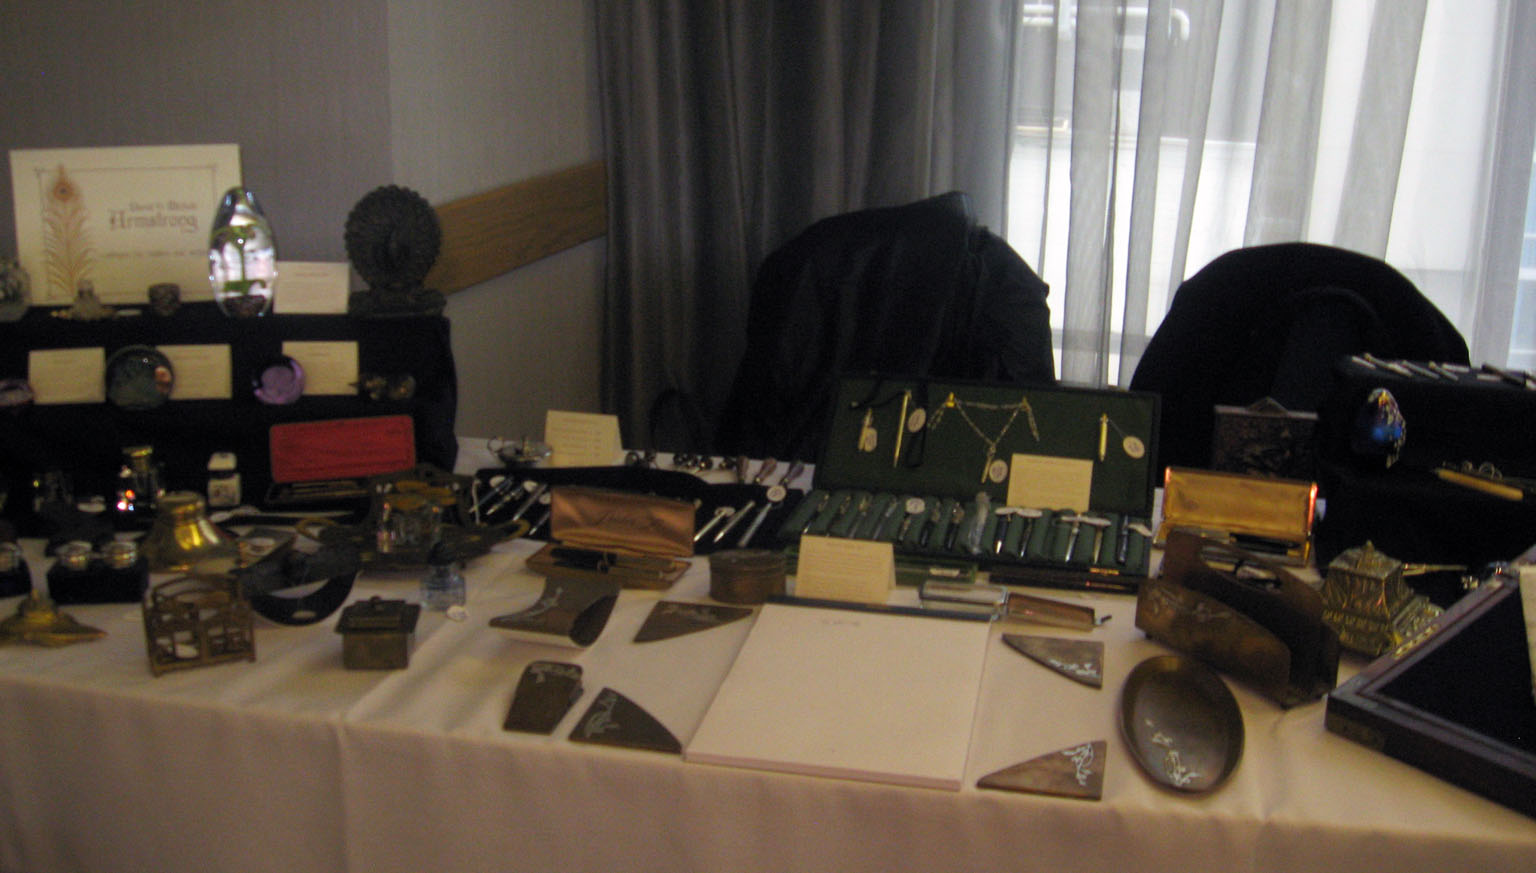
    We are happy to be attending the Toronto International Pen Show this year, for the first time. The show runs from 9:30 am to 5:00 pm, Saturday October 23, 2010, at the Hilton Toronto Airport Hotel & Suites.

    We have booked an eight foot table, and will easily fill it. Amongst our inventory will be such diverse items as:

    • fountain pens, largely Parker 51s, including an unusual late-40s double-jewelled demonstrator;
    • dip pens, including some in original boxes;
    • propelling pencils, including Mordans and a Yardolette in the original box;
    • inkwells;
    • writing boxes, including one from the late 1700s;
    • bookends;
    • paperweights, including an early O’ Keefe
    • sterling bookmarks;
    • custom pen repair tools;
    • a nearly-complete early Heintz desk set;

    As always, all items on display are clean and fully functional. Restoration is done as required, and clearly noted as such.

    We are looking forward to seeing all of you there!

    Addendum

    And see you all there, we did. The Show went well, with a steady stream of visitors from start to finish. We had a grand time meeting all sorts, including an Irish lawyer, a flex-nib-obsessed artist, and two representatives of the Toronto Steampunk Society.

    And we can now do the demonstration of our 18th century writing box in our sleep…