Is handwriting dead? Not if Tanja Tiziana has her way! See the delightful short documentary film “Ink”, by Ryan Couldrey.
Is handwriting dead? Not if Tanja Tiziana has her way! See the delightful short documentary film “Ink”, by Ryan Couldrey.
The world of mechanical pencils isn’t what it once was.
If you visit a stationery or office supply store today, you will generally find two sorts of mechanical pencils: click, and clutch. A click pencil is the one with skinny little leads, which are advanced with a “click”, by pushing the end button. Clutch pencils are usually found in the drafting tools, and hold a hefty 2 mm lead. When you push on the end, three claws push out of the end, releasing the lead.
But once upon a time, there were more. And they are there still, waiting to be discovered.
However, there can be some confusion as to how to operate vintage mechanical pencils; how to fill them; how to care for them. Hopefully this article will help to clear up some of the confusion.
Although mechanical pencils became popular, there was always a place for the simple clutch pencil, essentially unchanged for two hundred years. Much to the irritation of those in love with them, they will be ignored in this article, and we focus on their more complicated cousins, the true mechanical pencils.
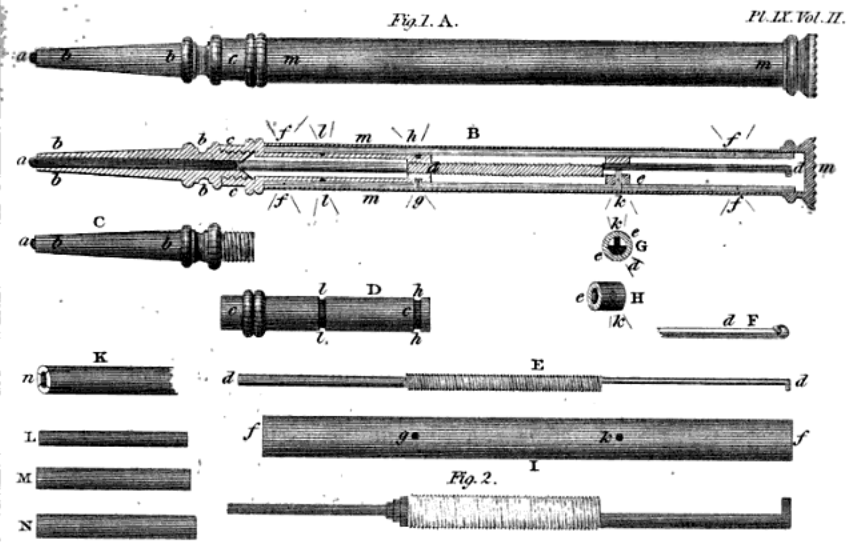
In the early 1800s, a silversmith named Sampson Mordan filed a patent for what would become the basis of almost all mechanical pencils: the helical drive. This began a renaissance in pencils, and thousands were produced, modified, and adapted, throughout the world.
While all mechanical pencils push the lead out—in fact, it can be argued that this is their very character—for some, that is their limit.
The earliest pencils, such as the Mordans, are simple, propelling pencils. The lead is manually pushed down a tube of matching diameter, and is friction-fit. A small rod inside pushes the lead forward, as needed, usually with a twist action mechanism. When done writing, the user twists the mechanism in reverse, and manually pushes the lead back down into it’s socket.
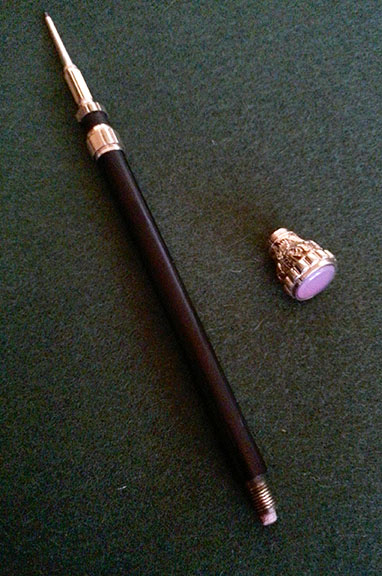
Some of these pencils are simple, some are fancy. With lead-storage compartments, erasers hidden inside the finial, or even finial-mounted engraved jewels, there was something for every income level. But until the early 20th century, they were generally all just plain, propelling pencils.
At some point, someone became understandably irritated with having to push down the lead in their pencil. “Wouldn’t it be nice,” we imagine them saying over dinner, “ if the darned thing would just go back in on it’s own?” And so the propel-repel pencil was born.
Where the previous incarnation of the pencil had the lead freely sliding in and out of a closely-fitted tube, a new innovation approached the problem a little differently. The end of the lead firmly fitted into a socket, and the socket—attached to a shuttle—moved up and down the length of the barrel.
This was an excellent and convenient solution, and users around the world sat at their desks, twisting the mechanism back-and-forth, watching the lead go in-and-out, solidly held in place.
Until the lead broke off, right at the socket. Then the only solution was to get out a very small drill bit, and ream out the socket, scattering graphite dust everywhere. Obviously more innovation was needed.

In the 1930s, a true innovation took place. Rather than simply wedging the lead into a socket, a propelling rod was placed inside the socket; one which travels only far enough to push remnants of the lead out of the socket, doing so only when the mechanism is at the furthest point of travel along the barrel.
This design was truly revolutionary, and is still in use in fine mechanical pencils today. It became eloquently known as the propel-repel-expel pencil.
These three main categories—propel, propel-repel, and propel-repel-expel—are not comprehensive. You may come across variations, and combinations, of two or all three varieties. But keeping these basic design types in mind may prevent you from trying to, for example, pull out a propelling rod, thinking that it is a piece of lead stuck inside. Or it may help you to recognize that more is wrong with that Vacumatic pencil than is first apparent.
No matter the mechanism with which your pencil is equipped, the action should be smooth and easily worked. The lead shouldn’t fall out in use, and it should be back in the barrel when you are done writing. It should be reliable and clean.
Not bad, for a two-hundred-year-old design.
When it comes to describing antique and vintage items, there are no standards. This is both a blessing, and a curse. For example: the term wet noodle. This term is used by some to describe a pen which writes with a high ink flow, and whose nib is extremely flexible. But there are some real difficulties with using terms like this, because it is so subjective.
Wet, compared to what? Flexible compared to what? Someone who has handled dozens of pens will have a completely different definition in their mind than someone who has handled hundreds, or thousands. And someone with a specific range of interests will often simply not pay attention to pens outside their chosen range. In contrast, a repair technician has no choice as to the pens they handle, and will thus have a wider range of experience. This may be vastly different from someone to whom they are speaking on the subject.
So, to avoid the problem of making subjective assessments, we don’t. We have a simple standard: we only make objective assessments. We get out the calipers, and the rulers, and we measure. Often to the tenth of a millimeter.
For example, when describing a nib, we might say:
This description means:

Is this nib a “wet noodle”? Some might say so others might not. We don’t use the term. It’s just not accurate.
This principle follows in a number of areas. Is it an “over-sized” pen? Is that box a piece of “treenware”? How is the barrel clarity? Is it a “BBB”? All subjective questions, and guaranteed to get a seller in trouble.
So, if you have a question, read the description carefully; both what’s in it, and what is left out. If a photo is needed to clarify, we have probably provided it. If not, we would be happy to.
One of the major issues for a fountain pen user is the constant quest for quality paper. Some time ago, the online pen community discovered, to their delight, a hitherto unkown paper: Tomoe River (pronounced toe · moe ´ eh).
Manufactured by one of the largest Japanese paper companies, Tomoegawa, this paper is very un-Japanese in character. Where the Japanese paper traditionally always has one smooth and one rough side, Tomoe River is like a Western paper: completely smooth on both sides. Sensually smooth. Originally intended for use in mail-outs and large catalogues, it is a 52g/m2 paper, but with a very low bulk, much like what we would see in Bible paper.
What thrills fountain pen users, however, is in it’s sizing. Referring to a chemical treatment received by most papers, sizing determines how absorbent the paper will be. In the case of pen ink, we absolutely do not want it to bleed through the page, or feather out along it’s lines. Tomoe River is astoundingly ink-proof. Even the wettest line stays crisp and clean, although it takes longer to dry.


It’s low bulk also means that a notebook made with Tomoe River paper is quite dense. In terms of page count, a journal the same size as the famous Moleskin notebook will pack in twice as many pages.
Unfortunately, it is only available in Japan, and can only be ordered from a few sources. Add to that the difficulty of dealing with another culture, a foreign language, and overseas shipping, and getting this paper can be quite a daunting task.
When the topic came up at the regular Toronto fountain pen “meet-up”, it was a case of jump in and do it, or do without it. So I checked my brain at the door (not put in so many words by my dear wife, but close), I volunteered to co-ordinate the buy. Fortunately a group buy had been done a few months earlier, and one of the group was happy to pass on his contacts and experience.
The boring part was the buy itself, involving multiple emails, screwed up orders, and several Paypal transactions. The bottom line? A three week wait, and 8.3¢ per sheet. Finally the paper came and, having just spent an evening doing the fun part (re-packaging the paper), I thought I would share some photos of the process.

The box, slightly the worse for wear, in all it’s 60 pounds of glory. Bright yellow tape shows that customs has both confirmed that they have collected their 13%, and that no baby orangutans were nefariously hidden inside.

Enclosures hawking the latest paper products and their uses were inside, to tempt all Kanji-literate customers in attendance.

Inside, four paper-wrapped packages of paper, each 2,000 sheets. Of the four, only one was pristine. The worst was, of course, the one which was certified baby-sea-turtle free, then stuffed haphazardly back in place. Fortunately the outer box was a perfect fit, so there was minimal sliding about during the short hop from the Gateway mail processing plant to our house.
This paper is thin enough that it is easily damaged. But even though some of the packages had torn, we only had about 60 sheets that were harmed. I’ll keep those as part of my lot, as binding them into notebooks means a fair bit of trimming waste. The damaged bits will simply be part of the trimming loss.

So what to do with four giant piles of paper? Most in the group have ordered in 500-sheet quantities, so it must be accurately divided. A scale would be a good choice, but the only one I have going into the fractions of a gram required measures about two inches square. However, math is our friend, and so are our fingers, which can detect differences of thousandths of an inch.

One 1,000-sheet ream can be split easily into two exact piles, side by side. And simply running your fingers over the two piles tells you instantly if they are the same. (Well, fine. There may be a variance of about 5 sheets. I’m not going to count 8,000 sheets of the skinniest paper you have ever seen for the sake of a couple of sheets!)

Pretty soon we have stacks of 500 sheets, and a couple of 1,000 sheets for the truly ambitious writers among us. But how to safely store, and transport, the paper?

My initial idea was to sandwich the paper between two legal-sized manila folders. This worked, but not too well.

Too much sloppiness for my tastes. This paper has to get hauled to a meet-up or two, probably by streetcar. It also needs to be stored, both here and at it’s final homes. Remember how fragile it is?
Then, and epiphany!

Out comes the paper cutter. The tabs are cut off for a tighter fit all around, and the ends are trimmed to more closely fit the A4-sized paper.

Much better! A tight fit means minimal wrinkles, no rain-drops, and easier storage.

And soon we have neat bundles, ready for delivery. Even the 1,000-sheet packages fit snugly and safely into the folders, one of which will even end up in the United Arab Emirates.
The eagle-eyed amongst us will note that there is still one package in the background. I’m out of elastics, so the two remaining packages, for Dennis and myself, will have to wait one more day.
It’s always fun to play with paper, and Tomoe River makes it even more of a joy. Somehow I think this won’t be the last Tomoegawa hears from us…
With our century-old box cleaned, finished, and re-lined, the only remaining job is to make a custom-fitted pen storage space, using the existing tray. Pens are designed to be used, but can also be inherently fragile, so this is an important detail if this box is to be truly functional.
We need a system of holding pens firmly in place, but this needs to be accomplished gently. The answer is a combination of old and new: baize, and closed-cell foam.
The combination of these materials will give us a soft, compartmentalized tray which will suit both the style of the box, and our needs for safe and secure storage.
We are fitting our pen storage compartment in the existing, original tray, which nests just under the box lid. We have lined the edges with marbled paper, to match the rest of the box interior. We carefully take measurements, so that the new storage tray will fit inside this without damaging this lining. (This would fall into the “measure twice, cut once” category of work.)
Baltic birch plywood is an excellent material for the inner base. It is light, strong, easily shaped, and takes glue well. The plied structure minimizes cracking and warping.


Shaping closed-cell foam is easy: use a sharp knife. We shape the foam so that the top of each ‘slot’ is slightly tapered inward. This will ensure that pens are held securely in place.
The best glue for the job—although it pains me to say so—is crafter’s ‘hot glue’. It sinks in to the pores of the foam and quickly sets in place. When you have to deal with modern materials, sometimes you have to use more modern materials! We also use hot glue to anchor the strips of foam in place on the wooden base.
After taking more careful measurements, we cut a piece of baize to fit over the foam dividers. It is difficult to calculate how much material you need to go in and out of the slots, so we are sure to dry-fit the fabric before actually cutting it to shape.


Baize is quite porous, so we are limited in what glues we use to hold it in place. We also have to keep in mind the material to which it must adhere. There is really only one option: get out the glue gun again, our last tool of choice. We work quickly, making sure that we flatten the bead of glue down before it hardens, so as to avoid ridges that might show through the thin baize. In this initial gluing, we securely glue the two long edges down to the under-side of the base.
With the baize firmly glued in place, we can now concentrate on the tricky part: the ends of the slots. Done carefully, it will look uniform and attractive. Done badly, it will draw attention to the ugly vessel, rather than the beautiful pens it holds.
We carefully trim away excess material, so that it will not bunch up underneath the tray. This is tricky, as we don’t want any of the white base showing through any gaps. A mistake at this point means throwing the entire thing out, and starting again from scratch!
Each end, of each slot, is carefully folded and glued in place. When we are done, each looks as identical as possible.

When we are done gluing the baize in place, we need to fit the storage tray in the original box tray. In taking measurements initially, we have allowed for the thickness of the fabric around the edges of the base, and it slips in place firmly, but without tearing the paper. And, finally, we get to use real glue! We use hide glue to stick the plywood base to the bottom of the tray.
The interior tray of this antique box has now been transformed into a custom-fitted pen storage tray. The foam will fit to the shape of most pens, and hold them safe and secure from misadventure.


As a final touch, we look to the base of the box. Traditionally not much attention was given to this; often a piece of rough burlap was stuck down to prevent damage to whatever surface the box rested on. However, we like to use the same baize as the interior.
Hide glue is again the best option. We cut the baize slightly over-size. Then, we apply a generous coat of hot hide glue, and let it cool for a few minutes. One of the fantastic qualities of hide glue is that it will become soft again with the application of heat, and even more so with steam. We use this to great advantage when applying baize to a flat surface like a writing box flap, a table top, or—as in this case—the bottom of a box.
We drape the baize over the tacky glue, and then use an iron to re-melt the glue. The glue then adheres to the baize, but without wicking through the fabric. Also, we can slide the fabric slightly as necessary, should we need to re-position it. Once the glue cools again (only a few minutes), we carefully trim the edges with a sharp knife. Any glue squeeze-out over the edge is easily cleaned up with a damp cloth.
And so we are done. A project like this is particularly satisfying for several reasons. We always enjoy getting a close look at the craftsmanship of a hundred years ago; even production pieces like this show an attention to detail and a quality of materials which is sorely lacking today, even in high-quality goods. Also, we get to take something which is only one step up from the trash heap, and make it useful and beautiful again. And knowing that it will be used as a showcase for beautiful pens is an added bonus!
Ephemera—the various pieces of paper that are a part of everyday life—are, by definition, disposable. In many cases (thinking of my shopping lists), that is no great loss. However, there are times when it would be more than just idle curiosity to see what is on those old papers.
Being the sharing types, when we recently came across a pristine Canadian-production Waterman’s “Ideal” fountain pen in the wild, we were thrilled to find the original paper documentation included with it in it’s box. This pen is typical of many sold in the early part of the 20th century, and such ephemera gives us insight into that world. We get glimpses of such things as: prices, repair practices, intended uses, materials, available ink colours, advertising practices, factory locations, and more. (Interestingly, even one hundred years ago, on page two, pen repair technicians were reminding their customers not to ship pens with ink in them!) While similar ephemera are documented elsewhere, it is also of interest to note the differences between documentation produced by different branches of the same company.
Along with the pen was originally included a four-page pamphlet which lists filling instructions, contemporary repair charges, “Directions and Suggestions for the Use of Waterman’s Pencil” (including a cutaway diagram and reload instructions), and an ink advertisement page (gallon jug of ink, anyone?) This pamphlet is printed in black ink on both sides of a sheet of 22.9 mm x 28.6 mm light newsprint paper, folded once. The printing job is not great, with patchiness to some areas that has nothing to do with age. As well, the clarity of some of the illustrations is not great: the darkness on page three (the pencils) is the actual printing, and not our scanner.
Additionally, there is a small, full-colour, advertisement for ink, fitted to match the bottom of the box. This is 2.5 mm x 14.6 mm, and is printed in four colours on one side of a higher-quality, sized white paper. The paper weight seems to be around 20 lbs., about the same as our modern office paper.
Below are facsimiles of all of these, suitable for printing in the original sizes, or for viewing online. We decided on adding subtle watermarking to each page to discourage any unsavoury types from trying to pass off reproductions as originals (sadly, it does happen.)


