For today’s edition of Things We Find In Fountain Pens, we have something particularly creative.
The patient was a lovely Esterbrook “J”, in vibrant blue. The customer requested that, in addition to a new sac, we pay attention to the lever, as something seemed a bit odd to them. Good instincts!
The sac removal was gooey, but not unusual. The lever was operating as normal. We went into automatic, measuring the length of the space in the barrel with a probe, so as to cut the sac the right length. We prefer to individually measure each pen this way, rather than simply cut sacs to a prescribed length based on internet information. There is enough variability in pens to warrant this approach, and it doesn’t take much more time. But as soon as the sac was on the section, we knew something was wrong! it looked like a stub; just far too short.
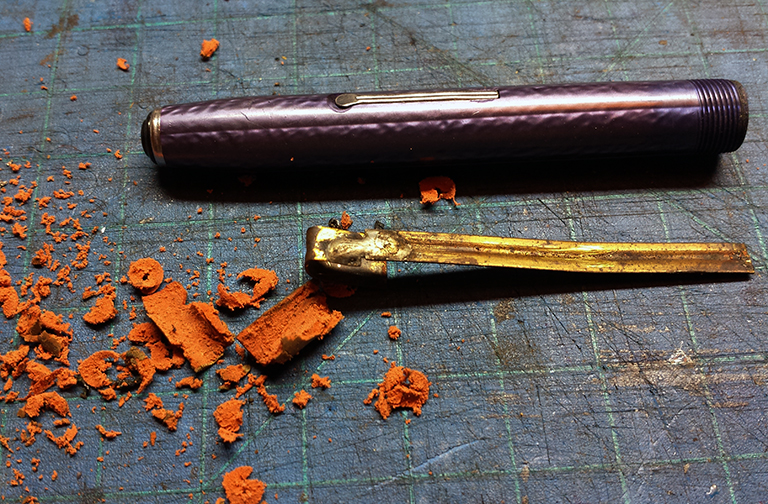
Things we find in fountain pens: erasers
A look into the barrel revealed something odd: a glimpse of pink. Could it be? More probing confirmed our suspicions.
At some point in the past, the j-bar had broken. Being brass, a repair person had soldered the pieces together. Now, brass is used in j-bars because, properly treated, it is springy. But if you heat it up (like soldering), it ruins that spring temper. Additionally, the repair was done using lead plumbing solder, which is quite soft. As is, the “repaired” j-bar simply bends, and stays bent.
And so began the creativity.
By jamming a round pencil eraser down the barrel, against the end of the j-bar, the bending force was transferred up the length of the j-bar to a portion which remained springy. And the j-bar was kept in place by the eraser, rather than the springy “J” portion of the bar.
Our solution was a bit more traditional: remove the eraser with a small drill bit (by hand, not in a drill); replace the j-bar with a new steel one; re-sac with a full-sized one.
But we had to share one of the most creative uses of an eraser we have yet seen!
We regularly find unusual things in fountain pens. Sometimes they don’t belong. Sometimes they do. Sometimes we understand why they are there. Sometimes we don’t. Sometimes they make us shudder. Sometimes they still make us shudder long after the pen has gone home.
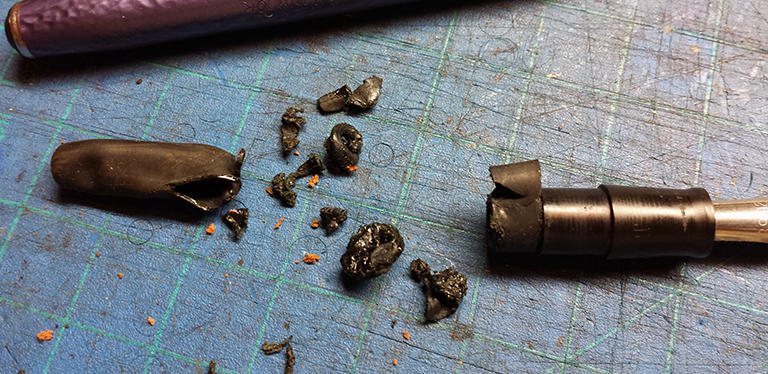
Behold, what we found in an innocent Esterbrook “J” pen. As you can see from the photo, the portion of the sac attached to the section’s nipple is intact and behaving like rubber ought: stretchy. The portion of the sac at the far end is likewise pliable. But the portion of the sac in the middle is different. It is a gooey mess: sticky, viscous, and disintegrating. How could this be?
This part is still viable. Why is the rest so gooey?
We have seen this countless times before. Each time we ask the customer, and—nearly without exception—have our suspicions confirmed. They have filled the pen with a boutique ink, usually a super-saturated colour.
We realize that many pen users out there love specialty inks. They love the colours. They love the exclusivity. Sometimes these inks offer characteristics not found elsewhere (such as indelibility, colourfastness, etc.) These qualities are excellent to have, but they can come at a cost.
Boutique inks are often made in small batches, by creative souls for whom ink is a passion, and chemistry is fun. But these enterprising folks usually don’t have the resources for serious research & development. They don’t have professional chemists available. And they often don’t have a supply of disposable vintage pens available for quality analysis.
As a result, there can be inks on the market which do fine in contact with modern acrylic or resin plastics. In a cartridge-converter, they are well-behaved. But put in contact with a rubber sac for days, weeks, or months, they can have an effect like that in the photo, above. And after they compromise the sac, they then can sit in contact with vintage plastics, and also have a damaging effect.
Targetted gooey?
So, we know you love your inks. And that is understandable. But we love your vintage pens. And we have seen too many examples over the years to be co-incidence: please don’t mix boutique inks and vintage pens.
What inks are safe to use in a vintage pen? Simply put, those made by the larger manufacturers: Parker, Waterman, & Pelikan are all good examples. J Herbin produces lovely colours, and has been doing so for hundreds of years with no damage to pens.
We love vintage pens, and we want to preserve those that remain, for as long as possible. But we also love the fact that they can still be used every day. But any time we use something old, there is an element of risk involved. Please help minimize this risk, by choosing to use the safest inks possible. And be sure that, in so doing, you will be able to use your pens for decades more to come.
Our hat is off to Dr. David Isaacson. Well known for his vacumania.com web site, and for his unabashed presence on fountain pen forums, David has quite generously released a huge archive of pen documents for download.
These documents—mostly in pdf format— include: catalogues, service manuals, promotional magazines, advertising material, and much, much more. We have not yet reviewed them for quality, but will be doing lots of reading over the weeks and months to come!
The files are hosted on his dropbox site, where they are organized by manufacturer. Because the archive is nearly a gigabyte in size, the files can be downloaded in smaller batches via the individual dropbox folders (use the button marked “download” in the top right corner of the page):
Undoubtedly there will be rumbles of discontent among those who were previously selling access to these, or similar, documents. But this repository is a grand gesture, and a valuable gift to our large community of pen aficionados. We, for one, applaud David and his generosity.
The early design history of the fountain pen is full of outstanding examples of innovation. Sometimes one glance is enough to tell you that you have found one of these gems. The Swan 4500 is unquestionably one.
In the early days of fountain pens, it was assumed that—with the exception of a few special-purpose users—most nibs would be flexible. And one issue faced by engineers was how to ensure a continuous flow of ink, no matter wide the tines were flexed apart.
Swan 4500Swan 4500 breakdown
This model, from the earliest days of the 20th century, boasts what we now refer to as an “over-and-under” feed. The designer’s intention was that the lower feed would provide a flow of ink, and an exchange of air to equalize pressure in the barrel reservoir. The upper feed would both wick ink to the very end of the nib, and limit the amount of flex to something reasonable. An adjustable button housed in the main feed would also provide the user with a means of custom ink flow regulation.
Another outstanding—if short-lived—innovation was a filling system which would spare users the necessity of unscrewing the section each time the pen needed ink.
i. features
Nib and over-feed detailNib and over-feed detail
The upper feed is quite robust, and for good reason: it’s made of the same 14kt gold as the nib itself. In the usual run of over-and-under feeds are made of hard rubber. While it is an excellent material, it is not at it’s best when it is very thin, as it tends to be brittle. But using gold for a thin over-feed overcomes this problem, and actually reinforces the nib’s natural springiness.
In examining the over-feed alone, we can see a few important details, unique to these Mabie-Todd pens. The exposed length of the feed is u-shaped in cross-section. This serves to prevent permanent bending under flexion. Additionally, there is a bend at the mid-point, opposing the upward flex of the nib. This again reinforces the nib in use, and keeps the feed in place.
When properly assembled, this feed is placed so that the end is very close to the tip. This holds a supply of ink at the ready, no matter how much is needed for the width of line.
Swan Underfeed detailMain feed close-up
The lower feed is also quite different from those we usually see. Made of hard rubber, it is shaped at both ends, and is pierced though it’s entire length. Most unusually, it is vented at the midpoint, allowing for huge ink flow. Two air channels run along the bottom length, allowing for extra pressure equalization as necessary.
Wire feed extender
The diamond-shaped longitudinal hole is designed to house another unique feature: a sterling silver wire feed extender, fit into a hard rubber button which rests against the lower side of the under-feed. This feed-extender helps to wick ink down from the end of the barrel, again in an attempt to help the ink flow keep up with the demands of the nib at full flexion.
Because the wires are in constant contact with the sides of the barrel, the extender may also have been planned to act like the early Parker “Lucky Curve”, helping ink in the feed to wick back down into the barrel when upright. This would have helped reduce the common eyedropper-related problem of a very messy nib and feed when not in use.
This brings us to the truly unique feature of this pen. The small “bulb”—attached to the wire feed extender, nestled snugly below the main feed—is also part of the filling system. The button can be caught with a thumbnail and pulled upward, out of the feed, exposing the wires. (See the diagram at the top of the page for a fabulous illustration of this.) Now the reason for the huge hole through the main feed becomes evident: a fine eyedropper can then fill the reservoir (in this case, the barrel) with ink directly through the feed. When full, the button is firmly pushed back home, like a cork in a bottle.
Additionally, as advertised, the bulb can be adjusted in place. This, in theory, enables the user to regulate the flow of ink to match their hand.
External-filling eyedropper pens are very rare, never having become very popular. This certainly did mean that delicate Victorian ladies didn’t have to wrestle with tight threading on their pens (or wait for their mighty husbands to return home, for much-needed assistance.) And it may have reduced some wear-and-tear on delicate threads. And the idea of regulating the ink flow may have appealed to the artistic writer; unfortunately the regulation process would have to be undergone whenever the pen was filled, and the button was displaced. Also, inky fingers were still pretty much guaranteed, which may have been the last straw for what ended up being a gimmick (although a great one, as gimmicks go).
The nib, typical of early Mabie-Todd production, is fabulous. When this nib was made, the days of fanciful Victorian handwriting were not long ago. This particular example is marked as a “broad point”; what we now refer to as a “stub”, measuring in at about 1.0 mm. It is also designated as a number “3”, an indication of the diameter of the nib’s size; specifically as it relates to it’s inside curve.
Swan broad-point (stub) nib detail
It’s flexibility is astounding. Springy, yet responsive, it can safely flex to about double it’s original line width. (Keep in mind that, even when expertly and deliberately made to be flexible, it’s only safe to flex any nib to about 70% capacity. Any more and you are inviting permanent damage. If you see it on the internet, don’t assume you can do it at home!)
The only real shortcoming of this nib is a fairly minor one: there is no stress-relief hole at the end of the slit. Often referred to by neophytes as a “breather” hole, the stress-relief hole serves an important function. Gold, like any alloy containing copper, gets brittle the more it moves. And all of the energy of tine flexion ends up compressing the little spot at the base of the slit. This is not a huge problem when a nib is properly engineered, like this one. But having one there is good insurance. However, there are plenty of nibs, like this one, which have no hole, are a hundred years old, and have lots of life in them yet. So we will let the lack of a stress-relief hole go this time.
ii. disassembly
warning: Disassembly of an old pen is inherently risky. Depending on the circumstances and history of the pen, it may do irreversible damage. We provide this information with the caveat that you apply it on your own pen at your own risk.
Disassembly is a fairly straightforward process. Remember a couple of basic, very important, principles and you won’t go wrong: patience, and heat.
Heat is the enemy of plastic, but the best friend of hard rubber. Hard rubber can withstand much more heat than plastics—easily as high as 200º f—before softening, and it retains it’s form, requiring active shaping to deform. As well, at a certain magical point (around that 200º f point), it will actually pop back into it’s original shape. It’s like an instant reset button, and this quality has saved many a repair person.
It may be tempting to use hot water, but do not, under any circumstances! Water, and especially hot water, will quickly and permanently discolour hard rubber. So stick to dry heat only.
As with all eyedropper pens, the gripping section is often screwed down quite tightly. (As an aside, Waterman actually marketed a special wrench to tighten and loosen sections on their eyedropper pens!) If it is stubborn, simply apply heat until warm to the touch, then try again. A non-slip pad can help grip things a little more firmly.
Once the section is threaded off the barrel, take a good look up the back end of the section. If it is filled with crusted ink residue, then the feed may be stuck in place with dried ink. In that case, more patience is warranted, and a very, very brief soak (less than five minutes) in cool ammonia water can help to cut through the residue. Be aware that this may well affect the colour of the section, so try everything else (dry heat) first. If you have an ultrasonic cleaner, this is very effective in reducing bath time and in loosening hard-to-reach spaces.
Wire feed-estender
The wire feed extender comes out first, through the back end. The tiny button beneath the under-feed can be gently pushed against to encourage this. The wire is fairly soft sterling silver, so try hard not to bend it. There may be varying amounts of corrosion you can’t see, and bends and breaks always happen there first. That would be bad, so be careful and patient. (We may have mentioned that last before.) When you see the way it fits, it is obvious why the hole through the main feed is diamond-shaped in cross-section.
It is a good idea to make a mark to designate the alignment of the nib/feeds assembly in the section. The section actually moulds to the shape of the assembly, and you will want to align it the same way when re-assembling the pen. Some people put a discrete notch at the back of the threads, which is hidden when the section is in place. Others might put a dot of colour. Temporary is better than permanent, always. And photographing things as you go is always a good idea, as you never know when you might need a reference.
Once the extender is out, the next step is to work out the gold nib and over-feed, through the front. It is safest to work these out as a unit, although it is not crucial to keep them together (the over-feed is much shorter than the nib, and will come out completely first). The important thing here is not to bend the over-feed, but to go patiently and carefully. Heat the section up before you begin, and gently rotate the nib around the central axis of the length of the pen, while pulling gently. The nib is actually tapered gently, with the thickest part at the tip, so it will become looser the further out it comes.
Next, and last, is the main feed. With the nib out, this should be fairly loose in the section, and it should pull right out, from whichever end is convenient.
iii. cleaning
The best time to clean a pen thoroughly is when it is apart. The gold and silver can be soaked in ammonia water, scrubbed with a soft toothbrush, and rinsed in plain water. The wire of the feed extender can be cleaned with a piece of the very finest steel wool, but be careful to get every tiny bit of steel residue cleaned off when you are done (wee bits floating around in a filled pen is bad). Try to get all of the old ink residue off, as some old inks can be corrosive. Silver is robust, but is much more prone to corrosion than gold. An excellent tool for cleaning and polishing the gold parts is a jeweller’s cloth impregnated with rouge.
The main feed can be soaked in ammonia, and also scrubbed with a toothbrush. Try to get any dried ink out of it’s nooks and crannies; clean holes and channels means good ink flow. Again, flush with plain water and pat it dry.
The section and barrel can be flushed with cool water. A large syringe or baster is an excellent tool for this. You can clean out the inside with damp cotton swabs, but be sure not to leave any fluffy bits inside (remember: wee bits + floating = bad?) This may take a lot of swabs! It’s a good idea to give inside the cap the same treatment.
iv. re-assembly
Re-assembly is the reverse of dis-assembly. Easy to say, I know. Keep in mind some tips:
Swan 4500 feed close-up
The main feed will be a bit loose, until everything is in place. Be sure it stays aligned with the mark you made on the section, and check it often during the re-assembly process. It wants to rotate in place.
Always use dry heat to prepare the section when fitting the nib and over-feed, so as to avoid stressing the material.
Use our reference photos when positioning the nib in the section, and between the feeds. The over-feed should be almost at the tip of the nib. (Note that the main feed in our photo is not yet fully seated in the section. However, it’s position relative to the nib is as it should be.)
Swan 4500 nib detail
Remember that the nib/feeds assembly will be a bit loose until the section has cooled down. You may be tempted to push the nib in further than it needs to go, but wait until things are cool to judge this one. However, as evidenced by the advert illustration, the nib is designed to sit further down the section than is seen in many modern pens.
Use the magical nature of hard rubber to your advantage. Once everything is back together, use dry heat to warm the entire section with nib, feeds, and extender in place. Take it up to the point where the smell of rubber is quite obvious, and it is very warm to touch. This will allow the material to even out it’s stresses and conform to the various necessary shapes. If something has become deformed, it will pop back into shape. Just don’t try this on non-hard-rubber plastics!
v. write!
An eyedropper pen is almost always an excellent writer; their shortcomings mostly involved the inherent messiness of carrying them around. This pen is no exception, and even after a century is still a better writer than most. Remember, though: don’t over-flex the nib! If you want massive line-variation, get a brush.
Another good practice with eyedropper pens is to always keep them topped up with ink. If you let one get much below half-full, you may end up with flow problems, and more of a mess than usual in the cap.
The Swan 4500 is one of the most outstanding eyedropper pens made. It’s engineering is unrivaled for it’s time, and has the added benefit of a most triumphant appearance. It’s flexibility and responsiveness is considered by many to be unparalleled. If you keep it clean, and away from excess water & sunlight, you will have a pen that will impress your own descendants, probably well into the next century.
P.S.: I know, the cap on ours is missing a piece at the lip. You can’t have everything…
Months of hard work are coming home to roost: Scriptus 2014, Toronto’s pen & writing show, is finally happening this Sunday, November 2, at the Toronto Reference Library.
We will be there, with most of our stock, both from Restorer’s Art, and from the letterpress side of things, at Sevanti Letterpress. Joining us will be nearly forty tables of pen and writing goodies, ranging from pens and pencils to inks to fine stationery.
We look forward to meeting any of you who can come visit. The show runs from 10:00 a.m. &endash;4:00 p.m., at the Appel Salon on the second floor of the Library at 789 Yonge St., just a block north of the Yonge & Bloor intersection in the heart of downtown Toronto.