Category: Tools

  • Basics: Categories of Vintage Mechanical Pencils

    The world of mechanical pencils isn’t what it once was.

    If you visit a stationery or office supply store today, you will generally find two sorts of mechanical pencils: click, and clutch. A click pencil is the one with skinny little leads, which are advanced with a “click”, by pushing the end button. Clutch pencils are usually found in the drafting tools, and hold a hefty 2 mm lead. When you push on the end, three claws push out of the end, releasing the lead.

    But once upon a time, there were more. And they are there still, waiting to be discovered.

    However, there can be some confusion as to how to operate vintage mechanical pencils; how to fill them; how to care for them. Hopefully this article will help to clear up some of the confusion.

    Although mechanical pencils became popular, there was always a place for the simple clutch pencil, essentially unchanged for two hundred years. Much to the irritation of those in love with them, they will be ignored in this article, and we focus on their more complicated cousins, the true mechanical pencils.

    Beginnings: Sampson Mordan
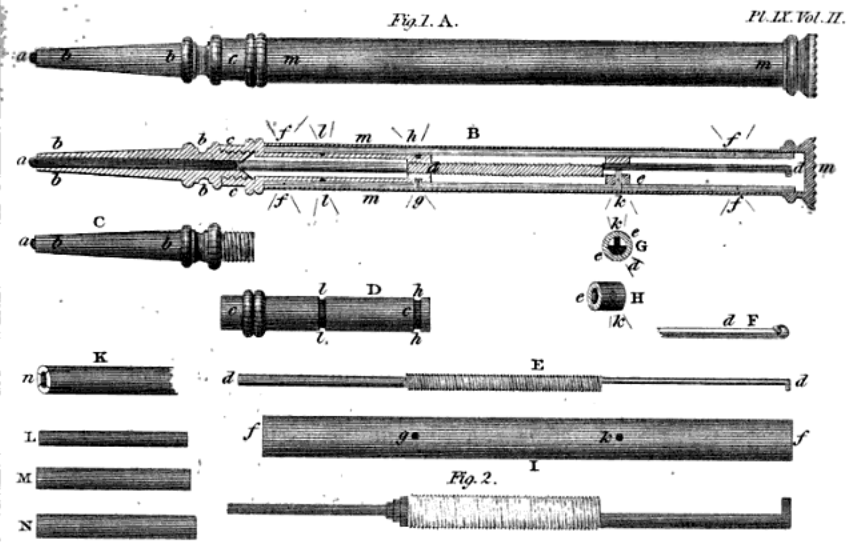
    1822 Mordan Patent Drawing
    1822 Mordan Patent Drawing

    In the early 1800s, a silversmith named Sampson Mordan filed a patent for what would become the basis of almost all mechanical pencils: the helical drive. This began a renaissance in pencils, and thousands were produced, modified, and adapted, throughout the world.

    Type One: Propelling Pencil

    While all mechanical pencils push the lead out&#0151in fact, it can be argued that this is their very character—for some, that is their limit.

    The earliest pencils, such as the Mordans, are simple, propelling pencils. The lead is manually pushed down a tube of matching diameter, and is friction-fit. A small rod inside pushes the lead forward, as needed, usually with a twist action mechanism. When done writing, the user twists the mechanism in reverse, and manually pushes the lead back down into it’s socket.
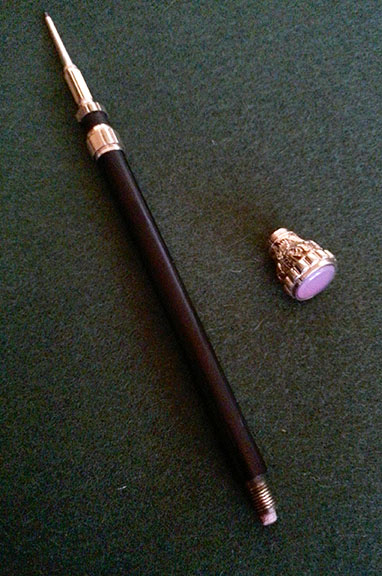
    Fancy Propelling Pencil
    Fancy Propelling Pencil

    Some of these pencils are simple, some are fancy. With lead-storage compartments, erasers hidden inside the finial, or even finial-mounted engraved jewels, there was something for every income level. But until the early 20th century, they were generally all just plain, propelling pencils.

    Type Two: Propel-Repel

    At some point, someone became understandably irritated with having to push down the lead in their pencil. “Wouldn’t it be nice,” we imagine them saying over dinner, “ if the darned thing would just go back in on it’s own?” And so the propel-repel pencil was born.

    Where the previous incarnation of the pencil had the lead freely sliding in and out of a closely-fitted tube, a new innovation approached the problem a little differently. The end of the lead firmly fitted into a socket, and the socket—attached to a shuttle—moved up and down the length of the barrel.

    This was an excellent and convenient solution, and users around the world sat at their desks, twisting the mechanism back-and-forth, watching the lead go in-and-out, solidly held in place.

    Until the lead broke off, right at the socket. Then the only solution was to get out a very small drill bit, and ream out the socket, scattering graphite dust everywhere. Obviously more innovation was needed.

    Type Three: Propel-Repel-Expel
    Yard-o-led Mechanism Detail
    The pinnacle of pencil design!

    In the 1930s, a true innovation took place. Rather than simply wedging the lead into a socket, a propelling rod was placed inside the socket; one which travels only far enough to push remnants of the lead out of the socket, doing so only when the mechanism is at the furthest point of travel along the barrel.

    This design was truly revolutionary, and is still in use in fine mechanical pencils today. It became eloquently known as the propel-repel-expel pencil.

    These three main categories—propel, propel-repel, and propel-repel-expel—are not comprehensive. You may come across variations, and combinations, of two or all three varieties. But keeping these basic design types in mind may prevent you from trying to, for example, pull out a propelling rod, thinking that it is a piece of lead stuck inside. Or it may help you to recognize that more is wrong with that Vacumatic pencil than is first apparent.

    No matter the mechanism with which your pencil is equipped, the action should be smooth and easily worked. The lead shouldn’t fall out in use, and it should be back in the barrel when you are done writing. It should be reliable and clean.

    Not bad, for a two-hundred-year-old design.

  • On Lime Juice

    Oxidation is often our enemy. When oxygen contacts metals, it reacts with the surface atoms to form what is known scientifically as an oxide, but more commonly as rust, or tarnish. While in the case of some metals—such as copper—oxidation can result in a beautiful green colour, in the case of silver or iron it case cause damage.

    Especially in the case of iron or steel, rust causes pitting and weakening and can be very difficult to remove. We often run in to similar problems in the internal mechanisms of mechanical pencils, which are often made of brass. A build-up of oxidation can cause parts to seize together or become gummy.

    So, oxidation can be our enemy. Happily, the solution is simple, safe, and cheap: lime juice.

    Citric acid has long been known as a very effective chellation agent. In simple terms, this means that it literally removes the top layer of metal atoms; since the top layer of atoms is bound up with oxygen, as tarnish, this is a good thing.

    How to Use Lime Juice to Remove Rust and Tarnish

    • Pour together in a glass bowl: 1 part lime juice, 3 parts vinegar;
    • Microwave until warm (this speeds up the reaction time);
    • Submerge the tarnished item in the solution, and leave for about an hour (or as long as overnight);
    • Wash off the item with warm, soapy water, using a soft brush. A dark, almost sludgy layer will come off, leaving a dull layer of metal. Polish if desired.

    Using this method even stubborn and pitted steel and iron will come out clean, including the fiddly detail in Victorian cast iron. And while this method does remove metal, the amount is very negligible, most of which was beyond recovery, bound up with oxide atoms. (One word of caution: some gold plating can be very thin, especially if produced in the last 50 years or so. You might want to use another method on items like this.)

    An additional benefit is that this solution, although acidic (with a pH of about 3) is safe for plastics and wood, and won’t compromise many adhesives (cyanoacrylates, like “crazy glue” being a notable exception).

    As an aside, it’s quite amazing how much oxidation just a bit of this solution can remove. Even if it looks grey and sludgy, there is still quite a bit of reaction-power left in it.

    A Note on ‘Patina’

    Does this method affect the patina of a metal item? Yes, and no, depending on your definition of the word. Courtesy of the Oxford English Dictionary:

    Patina
    a. A thin coating or layer; spec. an incrustation on the surface of metal or stone, usually as a result of an extended period of weathering or burial; a green or bluish-green film produced naturally or artificially by oxidation on the surface of bronze and copper, consisting mainly of basic copper sulphate (cf. verdigris n.).
    Heintz Bowl

    Factory-produced patina
    from the early 20th C.
    Heintz Vase

    And in two colours!

    In this case, a resounding yes! Destructive oxidation will be gone. So will the brown colour that develops over a few weeks or months on copper, brass, or bronze.

    One notable warning: in some cases (particularly in “Arts & Crafts” metal pieces) a specific chemical finishing process was used in their manufacture, resulting in a highly-sought colouration. This method will remove that finish. This is the “patina” most misunderstood by antique dealers, many of whom use it’s legend as an excuse not to spend time cleaning anything. A factory patina should not be confused with destructive oxidation, like rust. And, to our knowledge, few items made of silver were ever intended by their makers to remain blackened by tarnish.

    b. A gloss or sheen; spec. that on wooden furniture produced by age and polishing.
    c. fig. An acquired accretion of an abstract quality; a superficial impression or appearance.

    In these cases: the small signs of use that, over time, make something beautifully imperfect; the ancient ‘feel’ of an antique? No. You are cleaning it, thoroughly. But small dents and surface scratches will remain.

    Soaking metal in acid as a means of cleaning it is a serious step, and should only be done according to the rules of restoration and conservation: when needed to halt or repair damage. But when you need to do it, lime juice is fast, cheap, easy, and safe. The very definition of the most effective tools we have.

  • Re-purposing a Box—Part 6, Pen Storage & Conclusion

    With our century-old box cleaned, finished, and re-lined, the only remaining job is to make a custom-fitted pen storage space, using the existing tray. Pens are designed to be used, but can also be inherently fragile, so this is an important detail if this box is to be truly functional.

    1. Materials

    We need a system of holding pens firmly in place, but this needs to be accomplished gently. The answer is a combination of old and new: baize, and closed-cell foam.

    • Baize is a thick felted-wool cloth, traditionally used for the writing surface of writing boxes, or for the top of games tables. It is pH neutral, and gentle on the relatively soft plastics used in vintage fountain pens. Also, wool is an inherently ‘grabby’ material, so pens won’t slip around.
    • Closed-cell foam (think of those skinny camping mattresses) is resilient, retains it’s shape indefinitely, and cushions from harm even under the worst of circumstances.

    The combination of these materials will give us a soft, compartmentalized tray which will suit both the style of the box, and our needs for safe and secure storage.

    2. The Base

    We are fitting our pen storage compartment in the existing, original tray, which nests just under the box lid. We have lined the edges with marbled paper, to match the rest of the box interior. We carefully take measurements, so that the new storage tray will fit inside this without damaging this lining. (This would fall into the “measure twice, cut once” category of work.)

    Baltic birch plywood is an excellent material for the inner base. It is light, strong, easily shaped, and takes glue well. The plied structure minimizes cracking and warping.

    3. Foam Dividers

    A plywood base, with closed-cell foam dividers.

    All stuck down using a hot glue gun.

    Shaping closed-cell foam is easy: use a sharp knife. We shape the foam so that the top of each ‘slot’ is slightly tapered inward. This will ensure that pens are held securely in place.

    The best glue for the job—although it pains me to say so—is crafter’s ‘hot glue’. It sinks in to the pores of the foam and quickly sets in place. When you have to deal with modern materials, sometimes you have to use more modern materials! We also use hot glue to anchor the strips of foam in place on the wooden base.

    4. Baize Covering

    After taking more careful measurements, we cut a piece of baize to fit over the foam dividers. It is difficult to calculate how much material you need to go in and out of the slots, so we are sure to dry-fit the fabric before actually cutting it to shape.

    Applying baize.

    Cutting out excess baize...

    ...and gluing it in place.

    Each end should be folded identically, so as not to draw attention.

    Baize is quite porous, so we are limited in what glues we use to hold it in place. We also have to keep in mind the material to which it must adhere. There is really only one option: get out the glue gun again, our last tool of choice. We work quickly, making sure that we flatten the bead of glue down before it hardens, so as to avoid ridges that might show through the thin baize. In this initial gluing, we securely glue the two long edges down to the under-side of the base.

    With the baize firmly glued in place, we can now concentrate on the tricky part: the ends of the slots. Done carefully, it will look uniform and attractive. Done badly, it will draw attention to the ugly vessel, rather than the beautiful pens it holds.

    We carefully trim away excess material, so that it will not bunch up underneath the tray. This is tricky, as we don’t want any of the white base showing through any gaps. A mistake at this point means throwing the entire thing out, and starting again from scratch!

    Each end, of each slot, is carefully folded and glued in place. When we are done, each looks as identical as possible.

    5. Fitting the Pieces Together

    We cover the dividers with baize.

    When we are done gluing the baize in place, we need to fit the storage tray in the original box tray. In taking measurements initially, we have allowed for the thickness of the fabric around the edges of the base, and it slips in place firmly, but without tearing the paper. And, finally, we get to use real glue! We use hide glue to stick the plywood base to the bottom of the tray.

    The interior tray of this antique box has now been transformed into a custom-fitted pen storage tray. The foam will fit to the shape of most pens, and hold them safe and secure from misadventure.

    6. The Finishing Touch

    The finishing touch, baize padding for the bottom.

    Duplicating the original pattern.

    As a final touch, we look to the base of the box. Traditionally not much attention was given to this; often a piece of rough burlap was stuck down to prevent damage to whatever surface the box rested on. However, we like to use the same baize as the interior.

    Hide glue is again the best option. We cut the baize slightly over-size. Then, we apply a generous coat of hot hide glue, and let it cool for a few minutes. One of the fantastic qualities of hide glue is that it will become soft again with the application of heat, and even more so with steam. We use this to great advantage when applying baize to a flat surface like a writing box flap, a table top, or—as in this case—the bottom of a box.

    We drape the baize over the tacky glue, and then use an iron to re-melt the glue. The glue then adheres to the baize, but without wicking through the fabric. Also, we can slide the fabric slightly as necessary, should we need to re-position it. Once the glue cools again (only a few minutes), we carefully trim the edges with a sharp knife. Any glue squeeze-out over the edge is easily cleaned up with a damp cloth.

    7. The End

    And so we are done. A project like this is particularly satisfying for several reasons. We always enjoy getting a close look at the craftsmanship of a hundred years ago; even production pieces like this show an attention to detail and a quality of materials which is sorely lacking today, even in high-quality goods. Also, we get to take something which is only one step up from the trash heap, and make it useful and beautiful again. And knowing that it will be used as a showcase for beautiful pens is an added bonus!

  • Re-purposing a Box—Part 5, Paper Lining

    We are now well along in our work on this century-old box, and we now face the biggest challenge thus far. You may remember that we were unable to salvage the original green velvet lining due to both wear and animal damage. We do, however, have an excellent option for replacement: hand-marbled paper. Marbled paper is a traditional 19th century material for lining boxes, and good-quality paper will stand up to wear equally as well as cloth.

    We have written about our local source of marbled paper, Robert Wu, before. Robert’s paper is just the thing for this box. It is traditionally made in the European tradition, using the highest-quality materials, and we know that he has patterns available that will match this box—and it’s new purpose for pen storage—perfectly.

    1. Overview

    We need enough paper to cover complete inside of the box: sides, lid, and bottom. Additionally we need to cover the inner portion of the sides of the tray. This box is fairly small, so we can do it with one piece of paper (keeping in mind that Robert uses large artist’s paper as a base, not just letter-size.) This is important, because multiple pieces would have to come from the same batch, otherwise the colours would not match. This is where having a local artisan is much better than ordering it from a retailer, or from some shady-but-cheap online merchant; you know exactly what you are getting, and are guaranteed to get exactly what you need every time.

    We have used Robert’s paper before, and it is everything you could hope for. There is nothing like slicing it, moistening it, and then pushing it around with glue-sticky fingers to truly test a paper product. Robert’s always passes with flying colours. He uses fine art papers and the best-quality ink. Even water-based inks, like are used in this pattern, don’t flake up or rub off when we work with them, which means that they will last well when this is in use in it’s relatively passive role as a pen storage box.

    2. Technique

    There a few important things to keep in mind when working with paper in this way:

    • not every glue is suitable. We need a glue that will not soak through the paper, but will remain on the surface. It should also have a high tack, so that the paper will stay where we stick it. Nothing meets our needs like hot hide glue.
    • Always keep the marbled pattern in mind.

    • the pattern is irregular, so we will have to be careful to keep congruent sections together, so that the interior pattern remains harmonious. Our goal is to have it look as if one sheet of paper has been simply laid down over the interior.
    • Pre-creasing folds is crucial if you hope for straight lines.

    • overlapping of pieces is essential, so that the underlying surfaces are not visible. We need to allow for generous margins and flaps. Another little touch that makes for a professional finish is in the edges. Rather than trim the paper flush with an edge, we fold it over, and then glue that in place. But all of this means that the pieces must be carefully measured, and folds must be pre-creased so that they are straight.

    Duplicating the original pattern.

    We carefully lay out the original fabric pieces as a pattern, penciling the shapes on the back of the paper. (We do, however, need to make an educated guess as to how much thickness differential there is between the two materials.) Doing this before we make any cuts ensures that we can keep the marbled pattern as intact as possible. We also try to keep the pattern sections as large as possible; folding is better than overlapping, but is more technically demanding and a little more risky, as the glue-dampened corners must be seated fully into the corners. If not done carefully, the paper can be damaged.

    3. The Lid

    Pre-creasing folds is crucial if you hope for straight lines.

    Detail of the finished lid.

    We have carefully chosen the paper for the interior of the lid. This piece is vital, as it is the first thing people will see when opening the box.

    A large centre piece will run from the front edge, across a 90° angle to the underside of the lid, and across another 90° angle to the back edge. Two separate pieces, with congruent patterning, will cover the sides. Each will have narrow flaps, which will be overlapped by the larger piece, so that there are no unsightly gaps showing the wood substrate.

    4. The Main Compartment

    We use a similar strategy when it comes time for the bottom section. The bottom is covered with one piece of paper. The sides, however, are different from the lid.

    Clamping is easy, with non-stick plastic cauls.

    Each side section was originally finished with a piece of cardboard, covered with velvet. The tray supports were cloth-covered wood. We have had to replace, for reasons of smell, these substrates. However, in the interests of good conservation practices, we simply replace them with cardboard and wood. Each panel is covered with paper as a unit, then glued in place. It is always good to dry-fit sections before gluing in any project. It allows you to adjust the fit until it is just right.

    You can never have too many clamps!

    Our glue is tacky, but still needs clamping. We need to have even pressure across the entire surface, and we also need to protect the glue-dampened paper from the clamp face. And here is where we have one modern tool which cannot be surpassed: a piece of plastic. We always keep pieces of thick, transparent acrylic plastic around the shop, for use as clamping cauls. Water-based glues will not stick to them, and plastic this thick won’t flex. With a few spring clamps, our paper and paper-covered cardboard and wood will stay in place while the glue dries. And when it is time to remove the clamps, the plastic simply falls away, with no damage of any kind to the paper.

    The finished interior.

    We have successfully glued the paper lining in place: lid, tray, and main compartment. When you open the box, you see a beautiful and literally unique pattern of marbling, in a colour which complements the wood of the box. When you remove the tray, the interior is a continuation of the pattern from the lid, looking almost as if the interior itself was marbled, rather than just being lined with paper.

    With the paper lining finished, we are almost done. Rather than let valuable pens rattle around in the box, we will make a fitted, padded, and lined storage compartment for the tray. Details of this will be in our next post.

  • Re-purposing a Box—Part 4, Hardware

    Some of the oldest boxes extant are held together with only wood, or perhaps with a few nails. By the 19th century, however, few of them were produced without decorative brass hardware. By the early 1900s—when our box was made—the Arts & Crafts movement put an emphasis on plain, simple parts made of copper, brass, and sometimes wrought iron.

    The condition of the hardware is important for two reasons. First, it plays an important role in the actual infrastructure of a box, supporting the lid, securing the contents, or even sometimes holding the whole works together. Second, it is decorative. And in a plain, simple box like this one, that decoration must match the style of the box perfectly, or it will ruin the entire effect.

    1. Assessment

    The hardware on our box is in great condition. All of the major parts are present, and there are no obvious blemishes or damage. Pieces are solidly in place. And the years of oxidation have not been polished away, which will match the well-handled feel of the wood.

    2. Hinges & Lid-stay

    Brass hinges and lid-stay

    The hinges are quite small, and are of middling quality. They are made of sheet brass, folded in half around the pin, drilled through for, and held in place by, the wood screws which hold them in place. While not as strong as cast brass, they have held up quite well over the years. One screw is missing, and it is obvious why: someone over-tightened the screw, and this has resulted in the wooden hole being stripped out. When the brass threads on the screw have no corresponding wooden threads to hold on to, it stays loose, and can easily fall out. We can replace the screw, but the threads need to be repaired.

    We find a replacement screw of similar size. Then , we find a piece of bamboo skewer of slightly smaller diameter than the hole, and trim it so that it’s length is the same as the hole itself. We squish a bit of fish glue down the hole, fit in the plug, and gently drive the screw in place. The plug will be split by the screw, and it will glue in place, conforming perfectly to the threads in the screw. The next day, once the glue has cured, the hole is solid, and nearly indistinguishable from the others. No 21st century products needed for this repair!

    The lid-stay is an excellent piece of engineering. Simply made of a piece of shaped brass held in place by two brass plates, it holds the lid open at about a 115º angle—wide enough for gravity to keep it open, but never enough to stress the hinges. This little extra is why the hinges are solid, and the sockets are not broken out, as so often happens. As with most simple (one moving part), solidly engineered mechanisms, this one is in perfect condition.

    3. Why It’s Called Locksmithing

    The lock is simple and elegant, and is held in place by two screws underneath the tray supports. We have lots of experience in small box locks—nearly every box lock needs attention, a key, or both.

    Something is missing...

    The key for this lock is missing. But the lock is designed specifically for boxes such as this, and so the works are easily accessible once you pull it out of it’s socket. A good look at the workings tell us that it is a simple mechanism: the key’s tongue lifts up a spring, which allows a slide to move, freeing the pin attached to the lid. However, something is obviously wrong. There should be a pin which acts as a pivot point for the key. Without it, the key will be sloppy enough that it will be difficult to use the lock.

    ...a new pin...

    We can see where it once was, and we have a replacement key, so it is relatively simple to turn a small brass post of the right length and diameter to marry both together. A hot method of connection, such as brazing or soldering, will be solid, but will soften the surrounding metal. Like the original, we simply hammer, or pein the pin in place—in fact, you will be hard-pressed to find an old lock that is not held together entirely with cold connection methods. And any time you assemble something with metal parts by banging on them with a hammer, you are—you guessed it—smithing.

    ...and a key to match.

    (As an aside, blacksmithing is work done with iron and steel. When working with other metals, the trade was historically known as whitesmithing. And, of course, it didn’t take long for uppity gold- and silversmiths to think that they wanted their own trade names, and the tinsmiths ran along behind like everyone’s kid brother, not wanting to be left behind. Funny, you never hear of coppersmiths or brassmiths…)

    We fine-tune the shape of the key so that it fits and operates smoothly. Just before re-installing the lock, we will lubricate it with graphite. Graphite is perfect for mechanisms like this because it is dry, and won’t collect dirt and metal dust, like oil does.

    4. Appearance Is Everything

    Because we have some newly-made replacement brass pieces, there is one last thing we need to do. We need to match the patina of the older pieces.

    Patina is a funny thing; everyone knows that old patina shouldn’t be disturbed, but no one seems to know why not, or even exactly what it is. This is a subject which deserves a full-blog-post-rant, so we will address it that way, and soon. Suffice it to say that, in this application, we want to dull the brass and have it’s colour roughly match the other pieces around it.

    Modern manufacturers assume that people want a bright, shiny finish on their brass, so they put a lacquer finish on all of their products. We soak the screw and key in lacquer thinner for awhile, then use a rotary tool to buff off the coating. This gives us pure brass with which we can work.

    Colour matching...with a blow torch.

    When it comes to the patina of age on copper and it’s alloys (brass & bronze), it is the result of oxidation: oxygen reacting with the outer layer of atoms to form cupric oxide. While it normally takes years for this to develop, we can do it almost instantly. Heat greatly accelerates the development of oxides, and the presence of simple table salt will add some additional colour.

    We spray some salt water on the pieces, and then take the blow torch to them. Within seconds they are darker, and we repeat the process until we get the colour we want. If we heat them too much (to glowing red, about 1500º F) we will soften them—a process called annealing. So we are careful to heat them just until they darken, and then quench them in water.

    We carefully put all of the hardware bits-and-pieces in a ziplock bag, and label it. (Trust me on this: you only want to lose an important piece of a project once. For the sake of learning, we claim…)

    While it would be fun to put the hardware back in place right away, it would be premature. Because we still have to re-line the interior, which will be the subject of our next post.

  • Re-purposing a Box—Part 3, Exterior Finish

    After our initial assessment and de-construction, the next step in our process is to look after the exterior finish. In the case of this box, the finish is in quite good condition, so our efforts will be minimal.

    1. The Original Finish

    In our last post, we talked a little about how to use intact interior finish as a means of determining the appearance and nature of the original finish. The interior tray of this box is in almost perfect condition. This means that we don’t have to speculate as to how to duplicate it; we can simply use the tray’s finish as our model.

    An alcohol swabbing proves that shellac is the original finish.

    It has been well-established that shellac was used almost exclusively in finishing wood around the turn of the 20th century, and this box is no exception. To confirm this, we moisten a bit of cloth with 99% rubbing alcohol, and gently wipe the finish. If it softens, then leaves residue on the cloth (not just dirt, mind), then it is shellac. And our hypothesis is confirmed.

    Shellac is an entirely biological product. The resinous secretions of a small Indian bug are pulverized, dissolved in alcohol, and clarified. The resulting finish is strong, water-resistant, and long-lasting. It is also beautiful: warm in colour, and capable of taking on a high shine (french polish—that glassy polish used on the best 18th century furniture—is just thin layers of shellac, each of which has been highly polished.)

    Underneath the shellac is colour. Oak, the wood used in this box, was often darkend by exposing it to strong ammonia fumes. This results in the strong colour contrast in the figure of the wood. The colour is not deep, so if we want to preserve the original colour (which we do), we need to be careful not to remove it.

    The original, damaged, finish

    While shellac is a truly superior finish, there are a few effects which can take their toll. Sunlight is the worst, and most common. This box shows some damage to the shellac: some surface checking, and minor abrasion losses.

    There have been various products marketed over the years, claiming to be able to be able to dissolve and re-cure the residual finish. In our experience, once the original finish has been compromised, it can’t be restored like this. So, we need to consider other options.

    2. Removing the Outer Layer

    Having assessed the condition of the finish, we have a strategy. We are going to carefully scrape away the residue of the original outer layer of shellac, leaving the layer of colour behind. Then we can simply replace the shellac with a new layer.

    Our weapon of choice, the cabinet scraper.

    Our weapon of choice in this is a very thin cabinetmaker’s scraper. Essentially a piece of thick sheet steel about the size of an index card, this tool operates slowly, and provides superior control when removing a finish. While heavier scrapers are available for smoothing wood (ever wondered what was used before sandpaper?), the thin ones are much more gentle, and can be flexed in your hand to suit the width of the area on which we are working.

    Old shellac turns to dust.

    In the accompanying photos, you can see the results. The dry shellac scrapes off, turning to powder as we go. A gentle hand means that both the colour and the dents and dings that contribute to the patina of the piece are preserved as much as possible.

    A portion of old shellac completely scraped away.

    We carefully continue until the entire box is clear of shellac, being especially careful around corners (where it is especially easy to remove wood, rather than just finish), and the rounded box corners (where the wood fibres could be caught and torn by the scraper, should we be using it in the wrong direction, against the grain). We also remove the burlap from the bottom of the box.

    As a final step, we dampen a clean cloth with alcohol, and paint the entire area with it. Oak has very open pores, and shellac dust has gotten in all of those nooks and crannies. This step will serve to re-dissolve this residue, in effect giving the whole thing a very thin base coat of the original shellac.

    3. The New Finish

    Now we can lay down shellac over the original colour. The secret of fine shellac finishes is many thin layers, with a good curing time between each. Alcohol evaporates very quickly, and a thick layer invariably ends up looking gobbed or stripey. So, thin it is. We like to use shellac about the consistency of maple syrup, which means buying it in flakes and mixing it ourselves. If you want a job done right, do it yourself with materials you have processed yourself, as much as possible!

    New shellac gives a warm glow.

    We brush it on quickly and surely, and leave each coat until it is fully cured, and lightly rub it with extra-fine steel wool between each coat. (We like to use continuous-strand steel wool; it doesn’t leave behind and bits of steel, although we still wipe it clean after rubbing.) This serves to smooth any bits and pieces that may accidentally become embedded in the finish while it is drying. You don’t want a piece of grit or cat hair lurking under four layers of shellac!

    Compared with the original finish.

    Four or five coats looks about right. We compare it with the original finish, still intact on the tray. The tray is lighter in colour, but that is to be expected. ultraviolet light (sunlight) always darkens the patterns in the figure of wood. So, any internal fittings will always be lighter in colour. In this case, we are looking for similar thickness and sheen. Again, the tray is perfect and shiny, and the exterior is not. We could polish the exterior up between coats, like a French polish, but this box needs to remind people that it is old, and has been handled regularly for a century. So, the outside will not be as perfect as the protected interior fittings, and we like it like that.

    We will leave the final rubbing with wax paste for the very end, after the box has been entirely re-assembled. But for now, we can move on to the next step: the hardware.